Cart
Cart
|
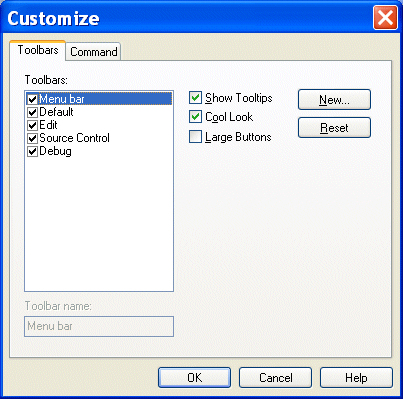
Home > Online Product Documentation > Table of Contents > Customizing Toolbars Customizing ToolbarsStylus Studio allows you to customize the appearance, location, and content of toolbars, and even to create toolbars of your own. This section covers the following topics: Toolbar GroupsToolbars are organized by functional group within Stylus Studio (Default, Edit, Source Control, and so on). Customizations available for these groups include
You control all these customizations from the Toolbars tab of the Customize dialog box.
To display the Customize dialog box, select Tools > Customize from the menu.Showing/Hiding Toolbar GroupsToolbar groups are displayed by default. Use this procedure to hide/re-display them.
To hide/show a toolbar group:
1. Display the
Customize dialog box (
Tools > Customize).
2. In the
Toolbars group box, deselect the check box of the group you want to hide.
The toolbar is dropped from the Stylus Studio window.
3. To re-display a hidden toolbar group, reselect the check box.
Changing Toolbar AppearanceChanges you can make to the toolbar's appearance include
To modify toolbar appearance:
1. Display the
Customize dialog box (
Tools > Customize).
2. Click
Show Tooltips to toggle the display of tooltips when the pointer is placed over a toolbar button.
3. Click
Cool Look to toggle the display of the toolbar between one that is rendered as buttons and one that is rendered as flat panels.
4. Click
Large Buttons to toggle the size of the toolbar buttons.
5. Optionally, click the
Reset button to restore default settings.
6. Click the
OK button.
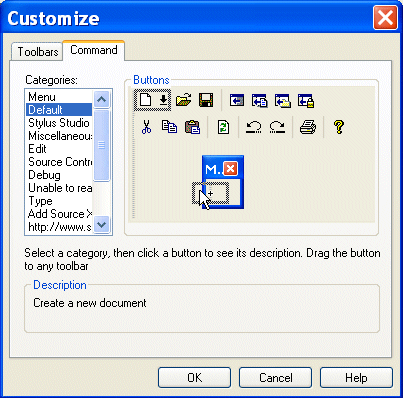
Adding and Removing ButtonsTo add a button to a tool bar:
1. Display the
Customize dialog box (
Tools > Customize).
2. Click the
Command tab.
3. In the
Categories field, click the group of buttons you want to rearrange (such as the
Default group shown in
Figure 101).
Stylus Studio displays the buttons in that group in the Buttons group box.
4. Drag the button from the
Buttons group box to the target location on the Stylus Studio toolbar.
5. Click a new category to rearrange buttons in that category, and click
OK.
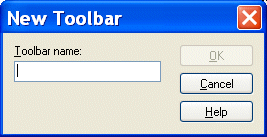
To remove a button from a toolbar, drag it off the toolbar.Creating a New ToolbarYou can create your own toolbars, adding to them the buttons for the tools that you desire. To create a toolbar:
1. Display the
Customize dialog box (
Tools > Customize).
2. Click the
New button.
Stylus Studio displays the New Toolbar dialog box.
3. Enter a name for the toolbar in the
Toolbar Name field and click the
OK button.
Stylus Studio creates a new toolbar window.
4. Click the
Command tab in the
Customize dialog box.
5. Select the toolbar group whose tools you wish to add to your new toolbar.
6. Drag the toolbar button from the existing toolbar to the new toolbar window.
8. When you are done, drag the new toolbar window to the Stylus Studio toolbar.
|
XML PRODUCTIVITY THROUGH INNOVATION ™