Cart
Cart
|
Home > Online Product Documentation > Table of Contents > Defining an XML Schema Using the Diagram Tab - Getting Started Defining an XML Schema Using the Diagram Tab - Getting StartedThis section provides a quick tour of the main features of the Diagram tab of the XML Schema Editor and shows you how to define a simple XML Schema. For complete documentation about how to use the XML Schema Editor, see Creating an XML Schema in Stylus Studio.
The topics in this section provide step-by-step instructions for defining the
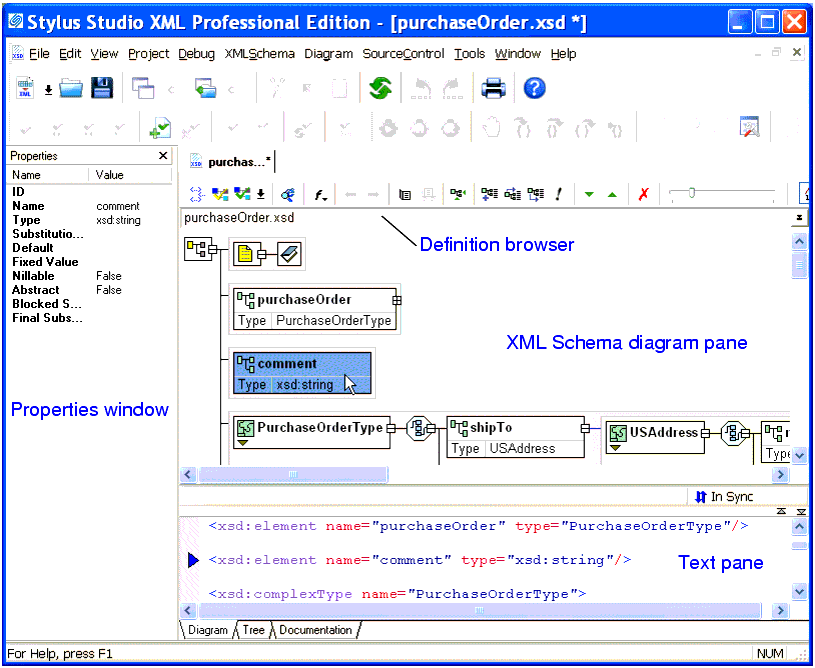
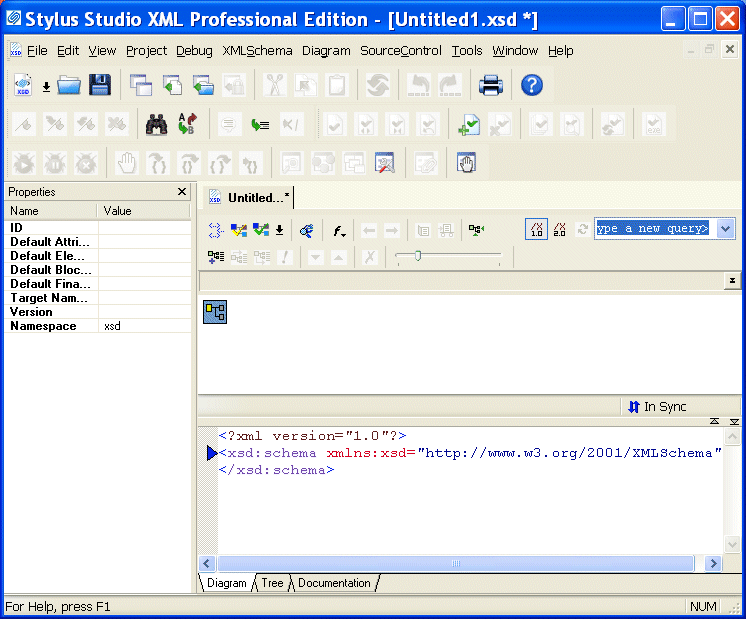
This section includes the following topics: Before you beginTo get started, you will need to start Stylus Studio if you have not already. See Starting Stylus Studio. Introduction to the Diagram TabThe recommended way to define an XML Schema in Stylus Studio is to start with the Diagram tab of the XML Schema Editor, which is shown in Figure 68.
When you use the Diagram tab to define an XML Schema, you can create XML Schema nodes directly on the XML Schema diagram pane using tools on the tool bar or from the XML Schema > Diagram and shortcut menus. You can also type in the text pane, which appears under the Diagram tab. The text pane displays the XML Schema syntax Stylus Studio creates for you as you work in the diagram pane. Stylus Studio ensures that the XML Schema you create is valid. For example, any nodes you define are created in the required order in the XML document that contains the XML Schema definition, regardless of the order in which you create them. The Diagram tab, shown in Figure 68, consists of three main areas: This section describes these areas and how to work with them. Diagram PaneThe diagram pane contains graphical representations of the elements, attributes, and other nodes that make up your XML Schema.
NodesEach node displayed in the diagram pane is represented by its own symbol; tool tips, which are displayed when you hover over a node in the diagram, identify the node's type (element, attribute, sequence, and so on). The symbols used in the diagram are summarized in Table 1.
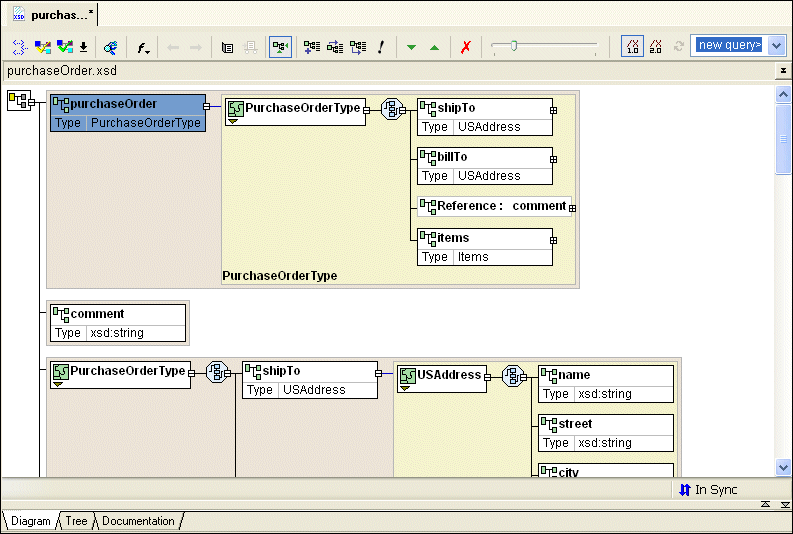
Nodes can be expanded and collapsed using the plus and minus symbols, respectively, that appear on the right side of the node. In
Figure 72 for example, the
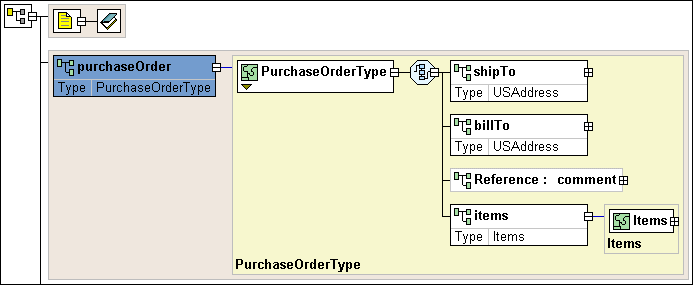
Displaying PropertiesTo streamline the diagram, most nodes are displayed with their properties hidden by default. Exceptions include element, extension, and restriction nodes, for which the type is displayed, as shown in the productName element in Figure 70.
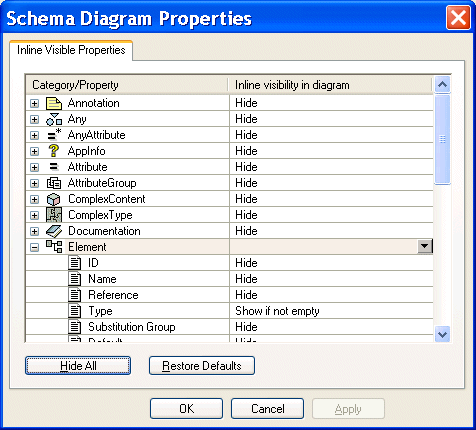
You can change the display for classes of nodes (all elements, for example) using the Schema Diagram Properties dialog box, shown in . (In addition, the Properties window displays all the properties for any node you select.)
For each node property, you can choose to If all of a node's properties have the same show/hide setting, that value is displayed in the Inline Visibility in Diagram field. If no value is displayed in the Inline Visibility in Diagram field, it means that two or more properties have different show/hide settings. To display the Schema Diagram Properties dialog box:
To change node properties display:
1. Display the
Schema Diagram Properties dialog box, or the
Diagram page of the
Options dialog box.
2. Select the node whose properties display you want to change.
3. Click
OK.
Background colorBackground color is used as another visual cue for information about the XML Schema:
Moving around the diagramThere are several ways to move around the diagram pane:
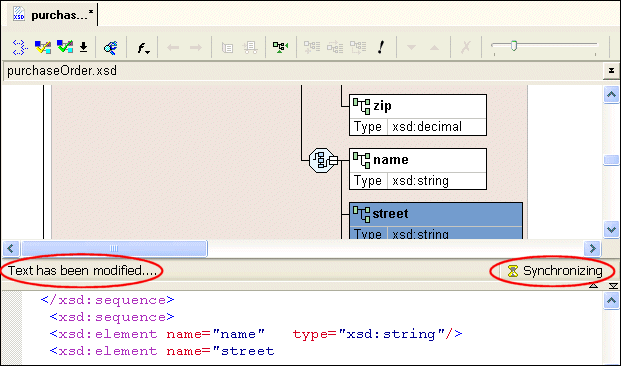
Text Pane
The text pane appears directly beneath the XML schema diagram pane. It displays the XML Schema code represented by the nodes you create in the diagram. The default font is Courier New, but you can change it to whatever font you want by clicking the Change
Font button (
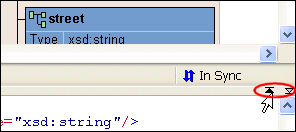
Stylus Studio synchronizes the diagram and text views of the XML Schema - any changes you make in the diagram are reflected in the text pane, and vice versa. Synchronization information is displayed in the bar that separates the diagram and text panes. Current status is displayed on the right. When the two views are synchronized, Stylus Studio displays this graphic:
You can use the splitter to resize the text pane to view more or less text, or you can hide it entirely using the controls on the splitter's right side.
Stylus Studio supports backmapping between the text pane and the XML Schema diagram pane - if you click a node in the diagram, Stylus Studio scrolls the text pane to display the line of XML Schema that defines the node you clicked. A blue triangle is displayed to the left of the exact line of code. Definition Browser
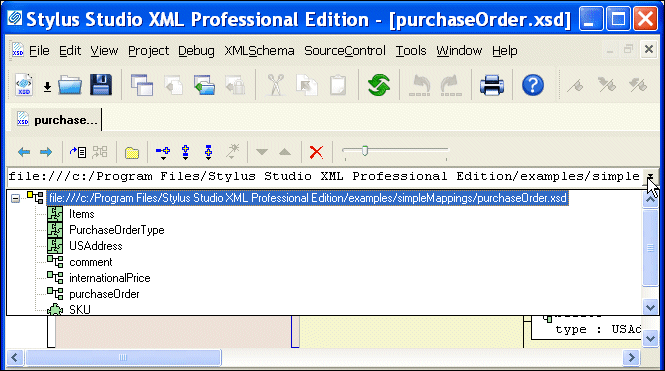
The definition browser is a drop-down list that displays all the child nodes of the
When you select a node from the definition browser, Stylus Studio displays a new page in the XML Schema diagram pane that shows the definition of the node you select. In addition, the definition browser displays information about that node.
To return to the page you were viewing previously, press the back (
Editing Tools of the Diagram TabMany of the operations you perform in the Diagram tab can be performed in a number of ways. This section briefly describes menu and tool bar use, and introduces additional features for defining XML Schema. In this sectionThis section covers the following topics: Menus and Tool BarsThe complete set of available operations is defined by the menu system. The tool bar provides a subset of frequently performed operations. The top-level menu ( XMLSchema > Diagram), the shortcut menus, and the tool bar are context sensitive - only operations that are permitted given the current context are available. For example, if you want to add an element to a sequence, you can
Each of these actions lets you add a
new node, in this case, an
In-place Editing
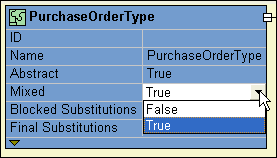
In-place editing allows you to change node names and properties directly in the diagram. For example, say you want to change the value of the
Mixed property of the
Similarly, if you double-click a node name, Stylus Studio places the property in edit mode, allowing you to type a new name.
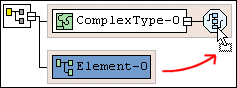
Drag-and-Drop
An alternative to using the menu and the tool bar is to use
drag-and-drop, which lets you add an
existing node to another node's definition. For example, say you wanted to add an existing
Use drag-and-drop any time you want to define a node using a node already defined in your XML Schema.
Typical targets of drag-and-drop operations include the following nodes Typical sources for drag-and-drop operations include the following nodes
QuickEditQuickEdit is a feature of the Diagram tab that streamlines common editing operations. For example, you can use QuickEdit to
For example, the following structure was created by selecting QuickEdit > Add Elements Choice from the
QuickEdit appears on the top-level and shortcut menus in those contexts in which it is available, and it is also available on the tool bar by pressing the QuickEdit button
Refactoring
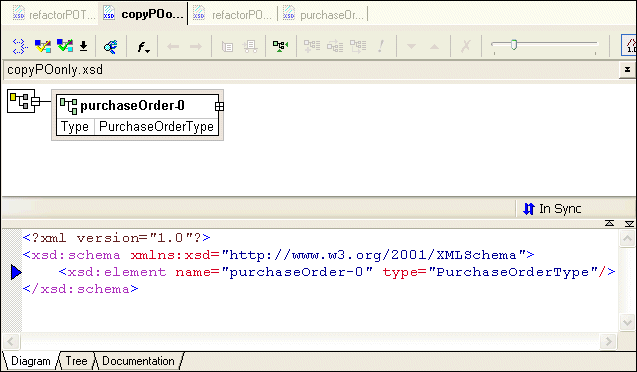
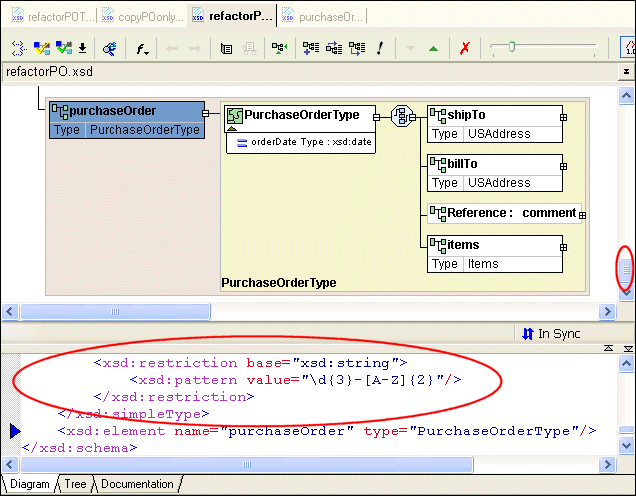
Refactoring is a process that allows you to copy globally defined nodes from one XML Schema and paste them in a new XML Schema. The difference between refactoring and a simple copy is that refactoring includes both the node you select and all its dependencies. Consider the following example: here is how the
As you can see, the copy action copies only the selected node to the clipboard. When the same node is copied using refactoring and pasted into another XML Schema document, the node, and all its dependencies copied as well.
Not all of the diagram or text are displayed in this illustration, but it is clear that more than just the
If you were to scroll up either the text pane or the diagram pane, you would also see, for example, the complete definitions for other global complexTypes such as
To refactor a node:
1. Right-click the node you want to refactor.
2. Select
Refactoring > Copy from the node's shortcut menu.
The node and all its dependencies are copied to the clipboard.
3. To paste the node in the target XML Schema document, select
Refactoring > Paste from the shortcut menu.
Description of Sample XML Schema
Suppose you want to define an XML Schema that defines
The following topics in this section describe how to define this XML Schema using the Diagram tab of the XML Schema Editor. Defining a complexType in a Sample XML Schema in the Diagram ViewThis topic is part of a sequence that begins with Description of Sample XML Schema.
The steps for defining the
Defining the Name of a Sample complexType in the Diagram ViewThis topic is part of a sequence that begins with Description of Sample XML Schema. To define a complexType in a sample XML Schema:
1. From the Stylus Studio menu bar, select
File >
New >
XML Schema.
Stylus Studio displays the XML Schema Editor. Maximize the XML Schema Editor window. If the Project window is visible, you can close it.
2. At the bottom of the XML Schema editor, click the
Diagram tab.
Stylus Studio displays the Diagram view for the new schema.
3. Right-click the
schema node in the XML Schema diagram pane and select
Add > ComplexType from the shortcut menu.
Alternatives: This action is also available from the XMLSchema > Grid Editing menu.
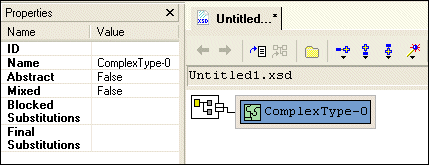
Stylus Studio displays a representation for the new node in the diagram. The complexType properties appear in the
Properties window. The new complexType has a default name of
4. Type
PublicationType in the
Name property in the
Properties window and press Enter.
Stylus Studio updates the diagram and the XML Schema in the text pane.
5. Click
Save
6. In the
Save As dialog box, in the
URL field, type
bookstoreDiagram.xsd, and click
Save. You can save it in the
examples directory of the Stylus Studio installation directory or in a directory of your choice.
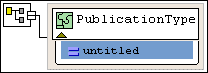
Adding an Attribute to a Sample complexType in the Diagram ViewThis topic is part of a sequence that begins with Description of Sample XML Schema. To add the genre attribute to the PublicationType complexType:
1. Right-click the
PublicationType node.
2. In the shortcut menu that appears, select
Add > Attribute.
Stylus Studio displays a node for the new attribute (
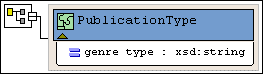
3. In the
Properties window, type
genre as the name of the new attribute and press Enter.
4. In the
Properties window, click the
Type field.
Stylus Studio displays a drop-down list of built-in types.
5. Scroll down to
xsd:string and click it, or type
xsd:string and press Enter.
The diagram should now look like the one shown in Figure 85 .
6. Click
Save
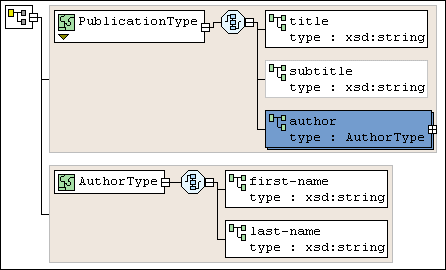
Adding Elements to a Sample complexType in the Diagram ViewThis topic is part of a sequence that begins with Description of Sample XML Schema. The elements belonging to this complexType must occur in a specific order. Before defining the first element, you need to create a sequence node to define this requirement in the XML Schema. To add the title element to the PublicationType complexType:
1. Right-click the
PublicationType node.
2. In the shortcut menu that appears, select
Add >
Sequence.
The
3. Type
title and press Enter.
4. Right-click the
sequence node
5. In the shortcut menu that appears, select
Add >
Element.
A child element is added to the
6. In the
Properties window, click the
Name field and enter
title.
7. In the
Properties window, click the
Type field.
Stylus Studio displays a drop-down list of built-in types.
8. Scroll down to
xsd:string and click it, or type
xsd:string and press Enter.
According to the XML Schema requirements described earlier, the
Adding Optional Elements to a Sample complexType in the Diagram ViewThis topic is part of a sequence that begins with Description of Sample XML Schema. To add the optional subtitle element to the PublicationType complexType:
1. Right-click the
sequence node
2. In the shortcut menu that appears, select
Add >
Element.
Below the
3. Rename the new element
subtitle.
4. Give the new element a data type of
xsd:string.
5. Give the new element a minimum occurrences value of 0.
You can accept the default of
6. Click
Save
At this point, the XML Schema diagram should look like Figure 86:
Adding an Element That Contains Subelements to a complexType in the Diagram ViewThis topic is part of a sequence that begins with Description of Sample XML Schema.
The sample schema requirements (see
Description of Sample XML Schema) state that the
Each element that can contain one or more subelements is a complexType. Consequently, to add the
To define the AuthorType complexType:
1. Right-click the
schema node in the XML Schema diagram pane and select
Add > Complex
Type from the shortcut menu.
Alternatives: This action is also available from the XMLSchema > Grid Editing menu. Stylus Studio displays a representation for the new node in the diagram. The complexType properties appear in the Properties window.
2. Type
AuthorType in the
Name property in the
Properties window and press Enter.
Stylus Studio updates the diagram and the XML Schema in the text pane.
3. Right-click the
AuthorType node in the diagram.
4. In the shortcut menu that appears, select
Add >
Sequence.
Stylus Studio displays the
5. Right-click the
sequence node.
6. In the shortcut menu that appears, select
Add >
Element.
7. Type
first-name in the
Name property in the
Properties window and press Enter.
8. Change the
Type property to
xsd:string and press Enter.
9. Repeat
step 5 through
step 8 to add a new element to the sequence, using
last-name as the name of the new element.
Now you can add the author element to the PublicationType complexType:
1. Right-click the
sequence node belonging to the
PublicationType node.
2. In the shortcut menu that appears, select
Add >
Element.
Stylus Studio displays a representation for the new node in the diagram. The complexType properties appear in the Properties window.
3. Type
author in the
Name property in the
Properties window and press Enter.
Stylus Studio updates the diagram and the XML Schema in the text pane.
4. Click the
Type field in the
Properties window. Stylus Studio displays a drop-down list of built-in types plus any types you have defined, such as the
AuthorType you defined in the previous procedure.
5. Select
AuthorType from the drop-down list.
6. Click the
Max Occur. field.
7. In the drop-down list that appears, click
unbounded.
8. Click
Save
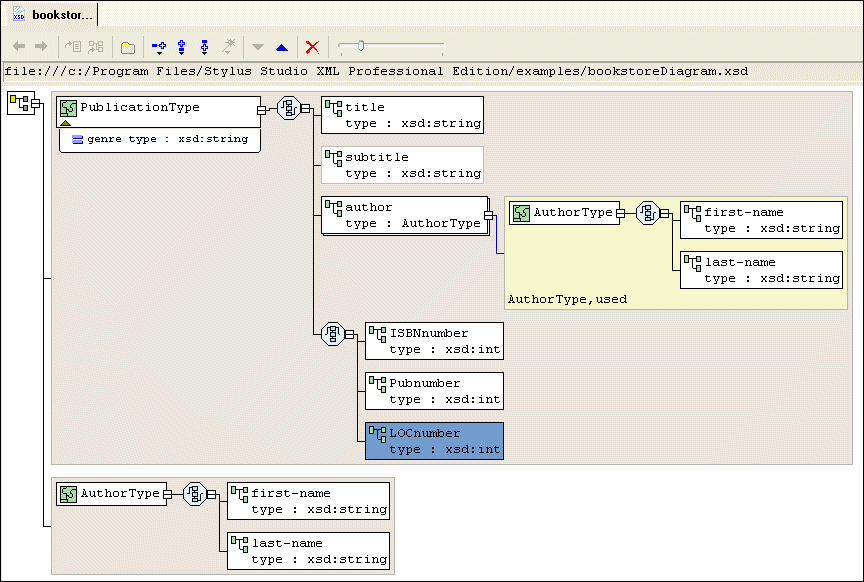
At this point, the XML Schema diagram should look like Figure 87:
Choosing the Element to Include in a Sample complexType in the Diagram ViewThis topic is part of a sequence that begins with Description of Sample XML Schema.
In the sample XML Schema, you want
To specify this:
1. Right-click the
sequence node belonging to the
PublicationType node.
2. In the shortcut menu that appears, select
Add >
Sqeuence.
Stylus Studio displays a representation for the new
We added the
3. Right-click the new
sequence node. In the shortcut menu that appears, select
QuickEdit >
Switch to Choice.
Stylus Studio changes the
4. Right-click the new
choice node.
5. In the shortcut menu that appears, select
Add >
Element.
6. In the
Properties window, change the
Name to
ISBNnumber and press Enter.
7. In the
Properties window, change the
Type
xsd:int and press Enter.
8. Repeat
step 4 through
step 7 twice: once to add the
PUBnumber element, and once to add the
LOCnumber element.
9. Click
Save
The definition of the
Defining Elements of the Sample complexType in the Diagram ViewThis topic is part of a sequence that begins with Description of Sample XML Schema.
In the final step of defining
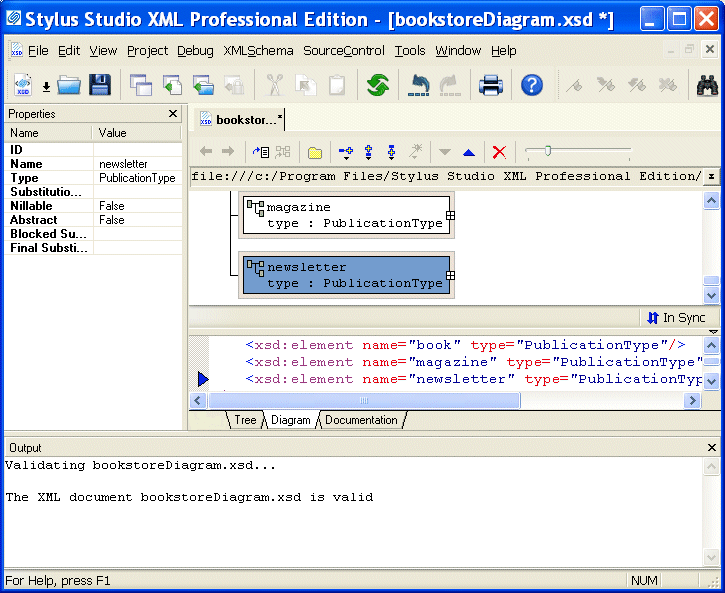
To define the book, magazine, and newsletter elements in the sample XML Schema:
1. Right-click the
schema node in the diagram.
2. In the shortcut menu that appears, select
Add >
Element.
Stylus Studio displays a node for the new element in the XML Schema diagram pane. The properties for the new element appear in the Properties window.
3. Type
book as the name of the new element and press Enter.
4. In the
Properties window, click the
Data Type field. Stylus Studio displays a drop-down list of built-in types plus any types you have defined.
5. Click
PublicationType.
6. Repeat
step 1 through
step 5 twice: once to add the
magazine element, and once to add the
newsletter element.
7. Click
Save
The
8. Select
XMLSchema > Validate Document from the menu to validate the XML Schema document you created.
The validation message appears in the Output window, as shown in
|
XML PRODUCTIVITY THROUGH INNOVATION ™