Cart
Cart
|
Home > Online Product Documentation > Table of Contents > Converting Text Files to XML Documents Converting Text Files to XML DocumentsStylus Studio provides document wizards that convert Comma Separated Value (CSV) and fixed-width text files to XML documents. A CSV or fixed-width file is an ASCII text file that can be treated as a table. That is, it implements the concepts of rows and columns. This section discusses the following topics: Alternative to Document WizardsStylus Studio's Convert to XML is a module you use to build converters that convert non-XML files to XML documents. Convert to XML converters can handle a number of file formats, including text, binary, and EDI. Another advantage of using Convert to XML to build your own converters is that the converter can be used to open a non-XML file as an XML document anywhere in Stylus Studio - as the source document for XQuery Mapper, for example. Once you build the converter, the conversion process takes place automatically any time you open a file with it. See Chapter 3Converting Non-XML Files to XML to learn more about the Convert to XML module. About CSV File ContentsIn a CSV file, a new line character flags each row of the table. A comma delimits each column within that row. For this scheme to work, all lines in the file must contain the same number of values. For example:
In a fixed-width file, a new line character also flags each row of the table. However, the width of a particular column is the same in each row. For example:
Delimiting CommasIf a value in a CSV file contains a comma, you must enclose the value in a pair of quotation characters. You can choose the character that you want to use as the quotation character. The default is to use double quotes:
If the character you use as the quotation character appears in a value that is enclosed in quotation characters, you must double each enclosed quotation character. For example:
If you want, you can include the names of the columns in the file. If you do, they must be the first row of data. For example:
If there are any invalid characters in XML tag names, the wizard replaces the invalid character with an underscore. Structure of Resulting XML DocumentsBy default, converting a text file results in an XML document with the following format:
The document wizard replaces value with the actual value that is in the imported file. If you want, you can specify that you want the document wizard to map the values to attributes of the row elements. The output would look like this:
About the Default ValuesStylus Studio uses these default values for converted files:
When you convert a file, you can change any of these values. At any time, you can select Make Default to store the current settings in the Windows registry. Stylus Studio uses these new default values as the initial settings the next time the Convert dialog box is opened. If you want to reset the default values to the values that were in place when you installed Stylus Studio, click Reset Default in the Convert CSV to XML or Convert Fixed-Width to XML dialog box. Running the Convert CSV to XML and Convert Fixed-Width to XML Document WizardsTo run the Convert CSV to XML and Fixed-Width to XML document wizard:
1. In the Stylus Studio menu bar, select
File
>
Document Wizards. The
Document Wizards dialog box appears.
2. In the
Document Wizards dialog box, in the
XML Editor tab, double-click one of the following according to the format of the file being converted:
3. In the
Input URL field, type the name of the text file you want to convert, or click
Browse
4. In the
Input Encoding field, select the character encoding of the text file being converted. The default for your platform is typically UTF-8 or UTF-16. If you do not specify a value, the wizard uses the default for your platform.
5. In the
Root element name field, type the name you want for the root element in the XML document. The default is
document.
6. In the
Row element name field, type the name you want for the row elements in the XML document. The default is
row.
7. In the
Column names are group box, click one of the following:
For more information on specifying user defined columns, see Specifying User-Defined Columns.
8. In the
Map value to group box, click
Child element to map the column values to child elements of the row elements. For example:
Click Attribute to map the column values to attributes of the row elements. For example:
9. If you are converting a fixed-width file, go to
step 12. You do not need to specify delimiting or quote characters for fixed-width files.
10. In the
Delimiter group box, accept the default delimiter character, which is a comma (,), select another common delimiter, or specify some other delimiter. The delimiter is the character that appears between values in the text file. Stylus Studio automatically displays the hexadecimal value for the character you specify. If you prefer, you can enter the hexadecimal value for the character you want. Stylus Studio automatically displays the correct character in the character field.
11. In the
Quote group box, accept the default quotation character, which is a double quote ("), select another common quotation character, or specify that you want to use some other character. Stylus Studio automatically displays the hexadecimal value for the character you specify. If you prefer, you can enter the hexadecimal value for the character you want. Stylus Studio automatically displays the correct character in the character field.
12. To specify that you want the current settings to be the default settings, click
Make Default so that it is selected. Stylus Studio copies the current settings to the registry.
13. To specify that you want the default settings to be the values that were in place when you installed Stylus Studio, click
Reset Default so that it is selected. Stylus Studio changes the default values to the values specified in
About the Default Values.
14. Click
OK. Stylus Studio converts the source document to XML and displays the resulting XML document in the XML editor.
15. In the Stylus Studio tool bar, click
Save
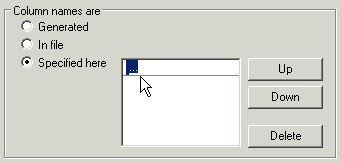
Specifying User-Defined ColumnsThe procedure for specifying user defined columns varies slightly based on whether you are converting a CSV or a fixed-width file to XML. Column Names for CSV FilesWhen you specify a user defined column for a CSV file, you need to supply a name for each column, as shown here.
To specify a column name for a CSV file:
1. Click the entry field next to
User defined.
2. Type the name for the first column.
3. Press Enter.
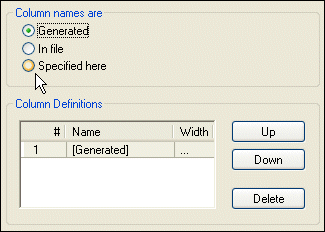
Column Names for Fixed-Width FilesWhen you specify a user defined column for a fixed-width file, you need to specify both the name and the width of the column, as shown here:
To specify a column name for a fixed-width file:
1. Click the
Specified here button.
2. Click the
Name field in the
Column Definitions group box.
3. Type a name in the field.
4. Press Tab.
The name value is entered, and a new row for the next column is added to the Column Definitions group box. The cursor appears in the Width field.
5. Enter a value for the column width and press Tab or Enter.
The column definition for the first column is specified in the wizard. |
XML PRODUCTIVITY THROUGH INNOVATION ™