|
|
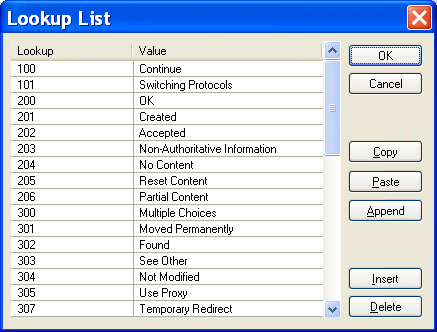
Home >Online Product Documentation >Table of Contents >Using Lookup Lists Using Lookup ListsYou can define lookup lists for individual fields. When Stylus Studio converts the input file, it replaces the string in the input file (the lookup) with the value you have defined for it in the Lookup List dialog box. Figure 180 shows an example of a lookup list that has been defined for a Status field: For any Status fields in the input document with a value of, say, 100, Stylus Studio would convert that value to Continue in the XML document it outputs; values of 202 would be converted to Accepted; and so on. Input file values that do not match a lookup are emitted in the XML document as-is, allowing exceptional values to be decoded. For example, you might have a temperature lookup list with these values for a <Temperature> field:
32 | Freeze
212 | Boil
All other temperatures would be emitted as-is. Defining Lookup ListsLookups are case-sensitive, so, for example, a lookup of bmw would not match any of the Make fields in the following sample file:
You can define lookup lists only for fields in rows for which a match pattern (even a blank match pattern, as is the default) exists. Finally, you can paste comma- and tab-delimited text directly into the lookup list. This allows you to easily reuse existing lookup tables without having to re-enter text.
To define a lookup list:
1. Select a row for which a match pattern exists.
2. Click the Lookup List entry field in the Properties window.
The Lookup List dialog box appears.
3. Enter lookup/value pairs in the corresponding entry fields.
4. When you are done, click OK.
Working with Lookup ListsThe following table summarizes the functions of the Lookup List dialog box, which allow you to work with new and existing lookup lists. |
XML PRODUCTIVITY THROUGH INNOVATION ™

 Cart
Cart


