|
|
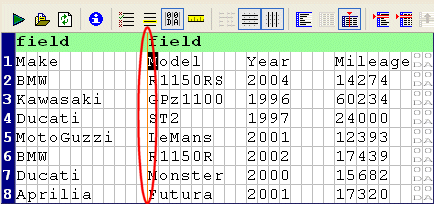
Home >Online Product Documentation >Table of Contents >Defining Fields Defining FieldsYou can define fields in any region in a fixed-width input file, as shown in Figure 175. Once you have defined a field, you can change its size by simply dragging it to any column in the grid. Each field you define is treated as a separate element in the XML output by the custom XML conversion definition. The input file shown in Figure 175, for example, would result in XML with two <field> elements, one consisting of the make of motorcycle, and one consisting of the model, year, and mileage. You can use the field feature to exercise control over the XML - defining separate fields for make, model, year, and mileage, for example. Consider the following input file:
By default, each row is considered to have a single field, containing Make, Model, Year, and Mileage, resulting in XML output like this:
If you specify fields for Model, Year, and Mileage, the XML output by the custom XML conversion definition looks like this: Neither approach is always correct, but this feature gives you the ability to define the type of XML output that is appropriate for your use.
To define a field:
1. Place the cursor in the document pane on the character with which you want to start the new field.
2. Click the Begin Field in This Column (
Stylus Studio displays a thin orange line that identifies the start of the newly defined field.
To remove a field:
The procedure for removing a field is the same as the procedure for defining one - place the cursor on any character adjacent to the field line you want to remove and click the Begin Field in This Column ( Creating Notes for FieldsStylus Studio allows you to create notes on individual fields. These notes are for reference purposes only; they are not output in the XML.
To create notes for a field:
1. Click the entry field for the Notes property.
The Notes dialog box appears.
2. Type the notes you want to associate with the field and click the OK button.
|
XML PRODUCTIVITY THROUGH INNOVATION ™

 Cart
Cart


