|
|
Home >Online Product Documentation >Table of Contents >Using the Spell Checker Using the Spell CheckerYou can use the Stylus Studio Spell Checker with all of Stylus Studio's text-based editors (like editors for XQuery and XSLT, for example) to both actively and passively check your documents for typographical errors such as misspellings and repeated words. Default Spell CheckingThe Spell Checker is on by default for most editors. This means that when you open a document in a Stylus Studio text editor, and as you type in that document, Stylus Studio checks the document for typographical errors. Words that the Spell Checker identifies as possibly containing a typographical error are underlined with a red "squiggle", like the word Worx shown in Figure 106.
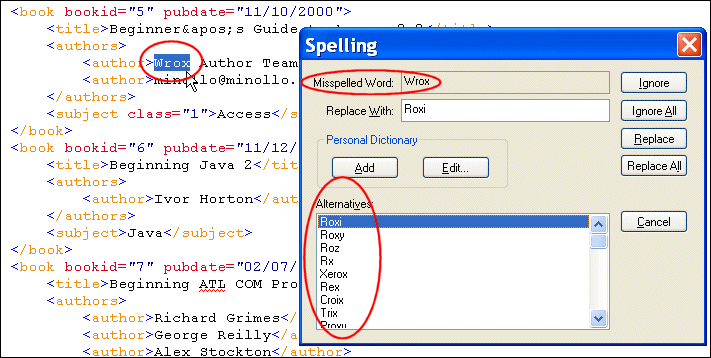
Manual Spell CheckingAt any time, you can manually spell check a document by selecting Tools > Check Spelling from the Stylus Studio menu. When you do this, Stylus Studio starts the Spell Checker, which reads through the current document. When it finds a possible typographical error, Stylus Studio displays the Spelling dialog box, as shown in Figure 109. Using the Spelling dialog box, you can
l Ignore the current occurrence of the word the Spell Checker has selected
l Ignore all occurrences of the word
l Replace the current occurence of the word
l Replace all occurrences of the word
l Add new words to the dictionary
l Edit existing dictionary content
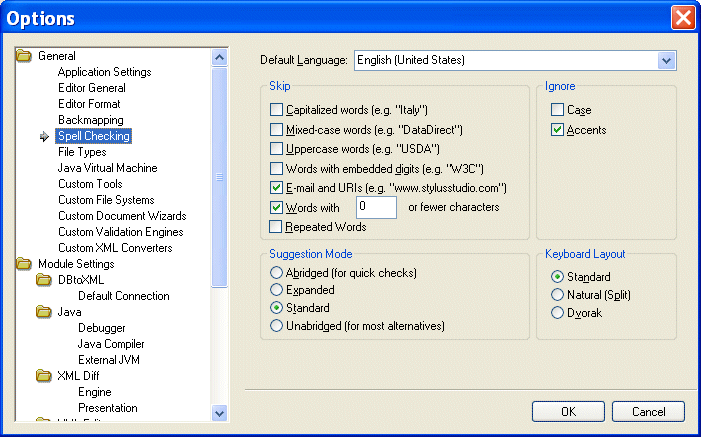
Specifying Spell Checker SettingsYou specify Spell Checker settings using the Spell Checking page of the Options dialog box. Spell Checker settings include
l Words to skip based on certain characteristics - you might decide to skip e-mail addresses and URLs, for example. Skipped words are not considered by the Spell Checker.
l Characteristics in words that you wish to ignore - you might not care about case or accents marks for spelling purposes. In this case, two words that share the same spelling, except for the characteristic you specify, are considered to be equivalent (même and meme (accent), or BMW and bmw (case),for example).
l The type of dictionary you want the Spell Checker to use when providing alternatives to the typographical errors it locates. Settings range from Abriged to Unabridged and show the fewest to the most alternatives, respectively. The Abridged setting results in fewer alternative suggestions for misspelled words than Standard (the default) or Unabridged, for example, but it requires less time to spell check a given document.
l The layout of the keyboard you are using. The Spell Checker uses this information to offer meaningful suggestions to words you might have mistyped.
How to Spell Check a Document
To spell check a document:
1. Select Tools > Check Spelling from the menu.
Stylus Studio starts checking the document for typographical errors. If it finds a typographical error, it displays the Spelling dialog box.
2. Once you select an action, the Spell Checker continues checking the document.
When you have addressed all identified errors in the document (either by replacing, correcting, or ignoring them), the Spell Checker stops.
Using the Personal DictionaryThe Stylus Studio Spell Checker comes with its own dictionary. You can create a personal dictionary and fill it with your own entries. Personal dictionaries are used in conjuction with the Spell Checker dictionary across all Stylus Studio editors. To add entries to the personal dictionary, you can
l Type entries individually
l Import lists formatted as .txt files
l Automatically add entries while you check the document
The personal dictionary is stored in the c:\Documents and Settings\username\
To add a word to the personal dictionary:
1. Start the Spell Checker and display the Personal Dictionary Editor dialog box (click Edit on the Spelling dialog box).
2. Enter a word in the New Word field.
3. Click the Add button.
The word appears in the Words in Personal Dictionary list box.
4. Click the Close button.
To import lists into the personal dictionary:
1. Start the Spell Checker and display the Personal Dictionary Editor dialog box (click Edit on the Spelling dialog box).
2. Click the Import button.
The Open dialog box appears.
3. Select the .txt file you want to import into the personal dictionary and click Open.
The words in the list you import appear in the Words in Personal Dictionary list box.
4. Click the Close button.
To export the personal dictionary to a .txt file:
1. Start the Spell Checker and display the Personal Dictionary Editor dialog box (click Edit on the Spelling dialog box).
2. Click the Export button.
The Save As dialog box appears.
3. Navigate to the directory in which you want to save the copy of the personal dictionary.
4. Enter a name in the File name field.
5. Click Save.
The contents of the personal dictionary is saved to the text file.
6. Click the Close button.
|
XML PRODUCTIVITY THROUGH INNOVATION ™

 Cart
Cart


