Cart
Cart|
|
Home >Online Product Documentation >Table of Contents >Configuring a Custom Document Wizard Configuring a Custom Document WizardThis section provides information and procedures for configuring a custom document wizard. It covers the following topics: The Custom Document Wizards PageYou use the Custom Document Wizards page of the Options dialog box to work with custom document wizards in Stylus Studio. This section describes how to display the Custom Document Wizards page and information about its fields. How to display
To display the Custom Document Wizards page:
1. In the Stylus Studio menu bar, select Tools > Options.
The Options dialog box appears.
2. If necessary, expand Application Settings and click Custom Document Wizards.
The Custom Document Wizards page appears.
About macros
Stylus Studio provides macros for some fields to help speed creation of custom document wizards. Available macros vary based on the field for which they are being used. To display macros available for a given field, click Predefined macros include
l ${StylusDir}, which indicates that the path you are specifying is relative to the Stylus Studio installation directory.
l ${PATH}, which specifies the PATH environment variable.
l ${OutputFile}, which is used to specify the output generated by the document wizard. This macro is available in the Command field only.
In addition, Stylus Studio creates argument variable macros for any arguments you define and displays them with other Command field macros. Name
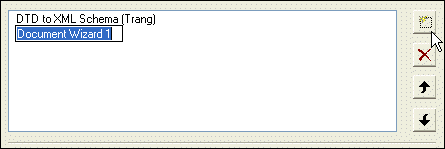
When you click the New button ( You should replace the default name (DocumentWizard1, for example) with the name you want to associate with the custom document wizard. The name you enter is
l Displayed in the Document Wizards dialog box along with the icon you specify for the custom document wizard.
l Used in the title bar of the dialog box the user sees when running the custom document wizard.
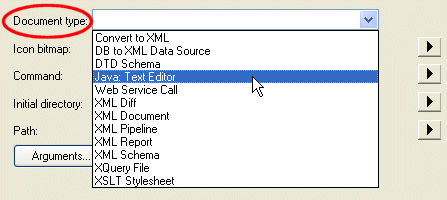
Document typeThe Document type field displays a drop-down list of available document types when you click it: The document type is the type of output generated by the custom document wizard (XML Schema, XQuery, and so on). The value you select determines
l The tab in the Document Wizards dialog box on which the custom document wizard is displayed (XML Editor, XSLT Editor, or Java, for example)
l The editor Stylus Studio uses to display the output generated by the document wizard
Icon bitmap
You use the Icon bitmap field to specify the path for the icon you want to represent the custom document wizard. This icon, along with the name you give the custom document wizard, is displayed in the Document Wizards dialog box. Click
If you leave the Icon bitmap field blank, Stylus Studio uses the following default icon for the custom document wizard: Command lineYou use the Command line field to specify a command line template. Stylus Studio uses this template to compose the command line that invokes the custom document wizard. Variables, such as ${InputFile}, are used in place of actual arguments. Users specify argument values when they run the custom document wizard. Consider the following example: This command line template allows Stylus Studio to start the specified Java class with a command line that includes the QuoteChar, InputFile, and OutputFile arguments. Argument variables can appear anywhere in the command. They must be in the form ${name}. For example: You must specify the ${OutputFile} argument variable in every command line template. Stylus Studio always generates the name of the file it opens as the value for the ${OutputFile} argument variable.
As with the Icon bitmap field, you can click
l Display the Custom Document Wizard Arguments dialog box, in which you can specify the command line arguments and their properties. See Defining Arguments for more information.
l Browse for and select a file you want to specify.
l Insert the ${StylusDir} macro.
l Insert argument variable macros for arguments you have already defined.
Initial directory
You use the Initial directory field to specify the directory you want Stylus Studio to use as the current directory when the custom document wizard is run. Click PathYou use the Path field to define paths to any files required by the custom document wizard. You do not have to define any paths that are already defined in your PATH environment variable. Separate multiple paths with a semicolon.
Click
l Browse for and select a file you want to specify.
l Insert the ${StylusDir} macro.
l Insert the ${PATH} macro.
Trace executionIf the custom document wizard you are configuring outputs processing information (error messages, stack traces, and so on), you can use the Trace execution feature to display this information in the Output Window of the Stylus Studio editor used to display the custom document wizard's generated document. Defining ArgumentsYou must define any arguments required by the custom document wizard using the Custom Document Wizard Arguments dialog box. Stylus Studio uses the arguments you define here to
l Compose the dialog box used to run the custom document wizard. That dialog box enables users to provide values for the arguments you define.
l Create argument variable macros, which you can then use to compose the command line template. Stylus Studio displays the argument variable macro it creates in the Command field menu.
How to displayThere are two ways to display the Custom Document Wizard Arguments dialog box:
l Click the Arguments button on the Custom Document Wizard page. Use this procedure if you want to define arguments before composing the command line template.
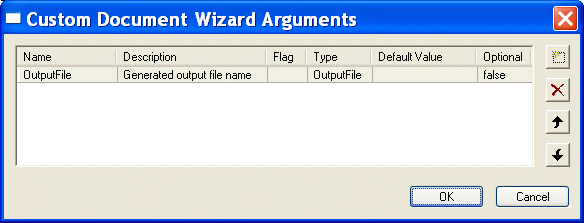
l Select Edit Arguments from the Command field menu that is displayed when you click OutputFIle argumentStylus Studio creates an OutputFile argument for each custom document wizard. You cannot delete this argument. You can change its order, if necessary, as described in the following section. Argument orderBy default, the arguments you define in the Custom Document Wizard Arguments dialog box are displayed to users in the order in which they are created. Arguments are displayed in a simple two-column grid, with the argument description in the first column, and an entry field for the argument value in the other. (See Figure 582 for an illustration of a custom document wizard dialog box.) Also by default, the OutputFile argument appears first.
You can change the argument order by
1. Selecting the argument whose order you want to change.
2. Clicking the up or down arrow to the right of the argument list box as needed.
Argument attributesYou can specify the following attributes for each argument you define:
l Name. Stylus Studio uses the value you enter in the Name field to compose the argument variable macro. This name is not displayed to custom document wizard users. Required.
l Description. The value you enter in the Description field appears in the custom document wizard dialog box that is displayed to users when they run the wizard. The description should provide users with adequate information about the argument's expected value. It can be useful to distinguish input and output arguments, for example. Required.
l Flag. The flag associated with the argument (-v, or simply - or /, for example). When Stylus Studio composes the command line for the custom document wizard, it uses the flag value as a prefix to the argument value supplied by the user.
l Type. The argument's data type. Table 188 summarizes valid values for the Type field and describes possible values for those types
l Default Value. The value used by Stylus Studio for optional arguments, unless another value is specified by the user when the custom document wizard is run. Default values for required arguments are ignored - Stylus Studio requires users to enter values for required arguments.
l Optional. Whether or not the argument is optional. Valid values for this field are true or false.
How to define an argument
To define an argument:
1. Display the Custom Document Wizard Arguments dialog box. See How to display if you need help with this step.
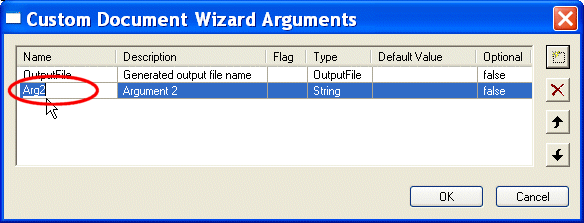
2. Click the New button (
A new argument is displayed in the Custom Document Wizard Arguments dialog box, with a default name and other default values.
3. Complete the argument attributes as described in earlier in this section. Remember that Description values appear in the custom document wizard dialog box when the user runs the wizard.
4. To define another argument, click the New button again.
5. If necessary, use the Up and Down arrows to change the argument order. Remember that the order in which arguments are displayed here is the order in which they appear in the custom document wizard dialog box when the user runs the wizard.
6. Click OK.
How to Configure a Custom Document WizardBefore performing this procedure, you should be familiar with the information in The Custom Document Wizards Page and Defining Arguments.
To configure a custom document wizard:
1. Display the Custom Document Wizards page of the Options dialog box. See How to display if you need help with this step.
2. Click the New button and enter a name for the custom document wizard. Remember that this value is used as the title for the dialog box displayed to the user when they run the wizard, as well as for the label associated with the custom document wizard icon displayed in the Document Wizards dialog box.
3. Click the Arguments button and define the wizard's arguments on the Custom Document Wizard Arguments dialog box. See Defining Arguments if you need help with this step.
4. Select the custom document wizard's document type.
5. Specify the command line template. See Command line if you need help with this step.
6. Optionally, specify an initial directory and path.
7. Click Trace execution if you want to display processing information generated by the custom document wizard in the Output Window of the Stylus Studio editor window associated with the custom document wizard's Document type.
8. Click OK.
|
XML PRODUCTIVITY THROUGH INNOVATION ™