|
|
Home >Online Product Documentation >Table of Contents >Example: Converting a Non-conforming EDI File Example: Converting a Non-conforming EDI FileThis section describes how to convert the code99.x12 EDI file to XML using the Stylus Studio EDI to XML module. This file is installed in the \EDItoXML\EDI files folder where you installed Stylus Studio. The code99.x12 EDI file uses a proprietary X12 format - one that is based on the X12 standard but uses enterprise-specific code lists and code list values. This example shows how to modify the XML Converter properties and local EDI definitions to accommodate this proprietary X12 format.
To convert code99.x12 to XML:
1. Select File > New > EDI to XML Conversion from the Stylus Studio menu.
The New EDI to XML Conversion dialog box appears.
2. In the Select a sample EDI document field, type the URI for the code99.x12 EDI file.
Alternative: Use the more button (
When you select the document, X12 is displayed in the Dialect field and 004030 is displayed in the Version field in the Select the dialect and version you need to customize group box.
3. Click OK.
The EDI to XML editor appears. The code99.x12 EDI file you selected in Step 2 is displayed in the EDI document pane.
The message in the status bar (No errors found) indicates that the code99.x12 EDI file has no errors. Or at least none that is apparent based on the default settings for the properties used by the XML Converter engine.
By default, the XML Converter engine does not validate code list tables. However, since our application development policy requires that we validate code lists, we need to change the code list validation property.
4. To display the property settings for the XML Converter, click the more button (
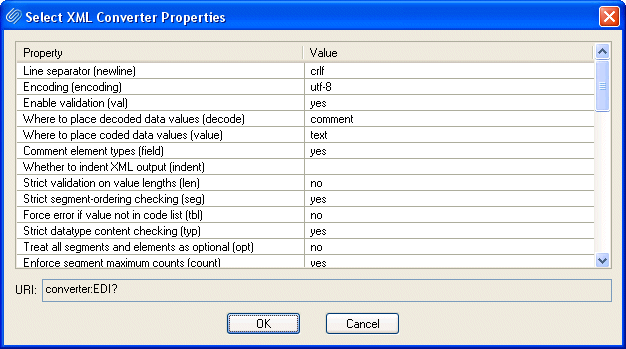
Stylus Studio displays the Select XML Converters Properties dialog box.
The property that controls code list validation is Force error if value not in code list (tbl).
5. Change the value for tbl to yes and click OK.
When you make a change to the SEF file, as we have just done by changing the XML Converter properties associated with it, Stylus Studio reloads the source EDI document after a moment. This occurs automatically, but you can force it by clicking the Waiting to reload document text in the status bar. You can also change the delay (by default, it is 5 seconds) in the Options dialog box (Tools > Options > Module Settings > EDI to XML).
See Working with Code Lists for more information on code list validation.
With code list validation on, we see that our EDI source document contains an error (indicated by a red squiggle at the error's location in the EDI document pane. If you hover the pointer over the red squiggle, a tool tip provides more information about the error:
6. When we alert our provider to this error, he informs us that all EDI documents he provides us for processing will include this code value in the Transaction Set Purpose Code code list, as it does in the code99.x12 EDI file we are using to build our EDI to XML conversion:
7. If we click line BGN:99:88200001:20041201 in the EDI document panel, Stylus Studio back-maps to the corresponding node in the EDI Structure tree. This allows us to see that the Transaction Set Purpose Code code list value 99 is not defined in the X12 standard:
We know we can ignore the error by suppressing code list validation (as seen earlier in this example). But to accommodate the new code value, we need to add it to the Transaction Set Purpose Code code list. We do this by modifying a local copy of the Transaction Set Purpose Code code list to include code 99. This modification to the standard will exist only in the SEF file that is used to convert other files of this type; we are not changing the definition of the EDI standard in the DataDirect XML Converter repository.
8. In the EDI Structure pane, right-click 353:Transaction Set Purpose Code and choose Add > Code from the shortcut menu.
Stylus Studio displays the Code Definition dialog box.
9. Enter 99 in the Value field; enter Status Under Review in the Description field, and click OK.
The values in the Transaction Set Purpose Code code list tree are displayed in bold, indicating that this definition (and any changes to it) is local, stored in the SEF file that represents our EDI to XML conversion. (For more information, see Customizing an EDI Standard.)
After a moment, Stylus Studio reloads the source EDI document. The red squiggle does not appear because we have added 99 to the code list table; the status bar displays an OK symbol (
10. To convert the code99.x12 EDI file to XML, click the Preview Result button (
The Save As dialog box appears, requesting that you save your EDI to XML conversion as a SEF file.
11. Provide a name for the file and click the Save button.
Stylus Studio opens the Preview window and displays the XML that results from converting the code99.x12 EDI file
|
XML PRODUCTIVITY THROUGH INNOVATION ™

 Cart
Cart


